基于Nginx的http_sssl_cert双向认证配置
背景
HTTPS是工作于SSL层之上的HTTP协议,SSL(安全套接层)工作于TCP层之上,向应用层提供了两个基本安全服务:认证和保密。SSL有三个子协议:握手协议,记录协议和警报协议。其中握手协议实现服务器与客户端的认证与密钥交换,记录协议进行数据加密并保证数据的完整性,警报协议则规定了错误类型和处理机制。
流程
认证流程
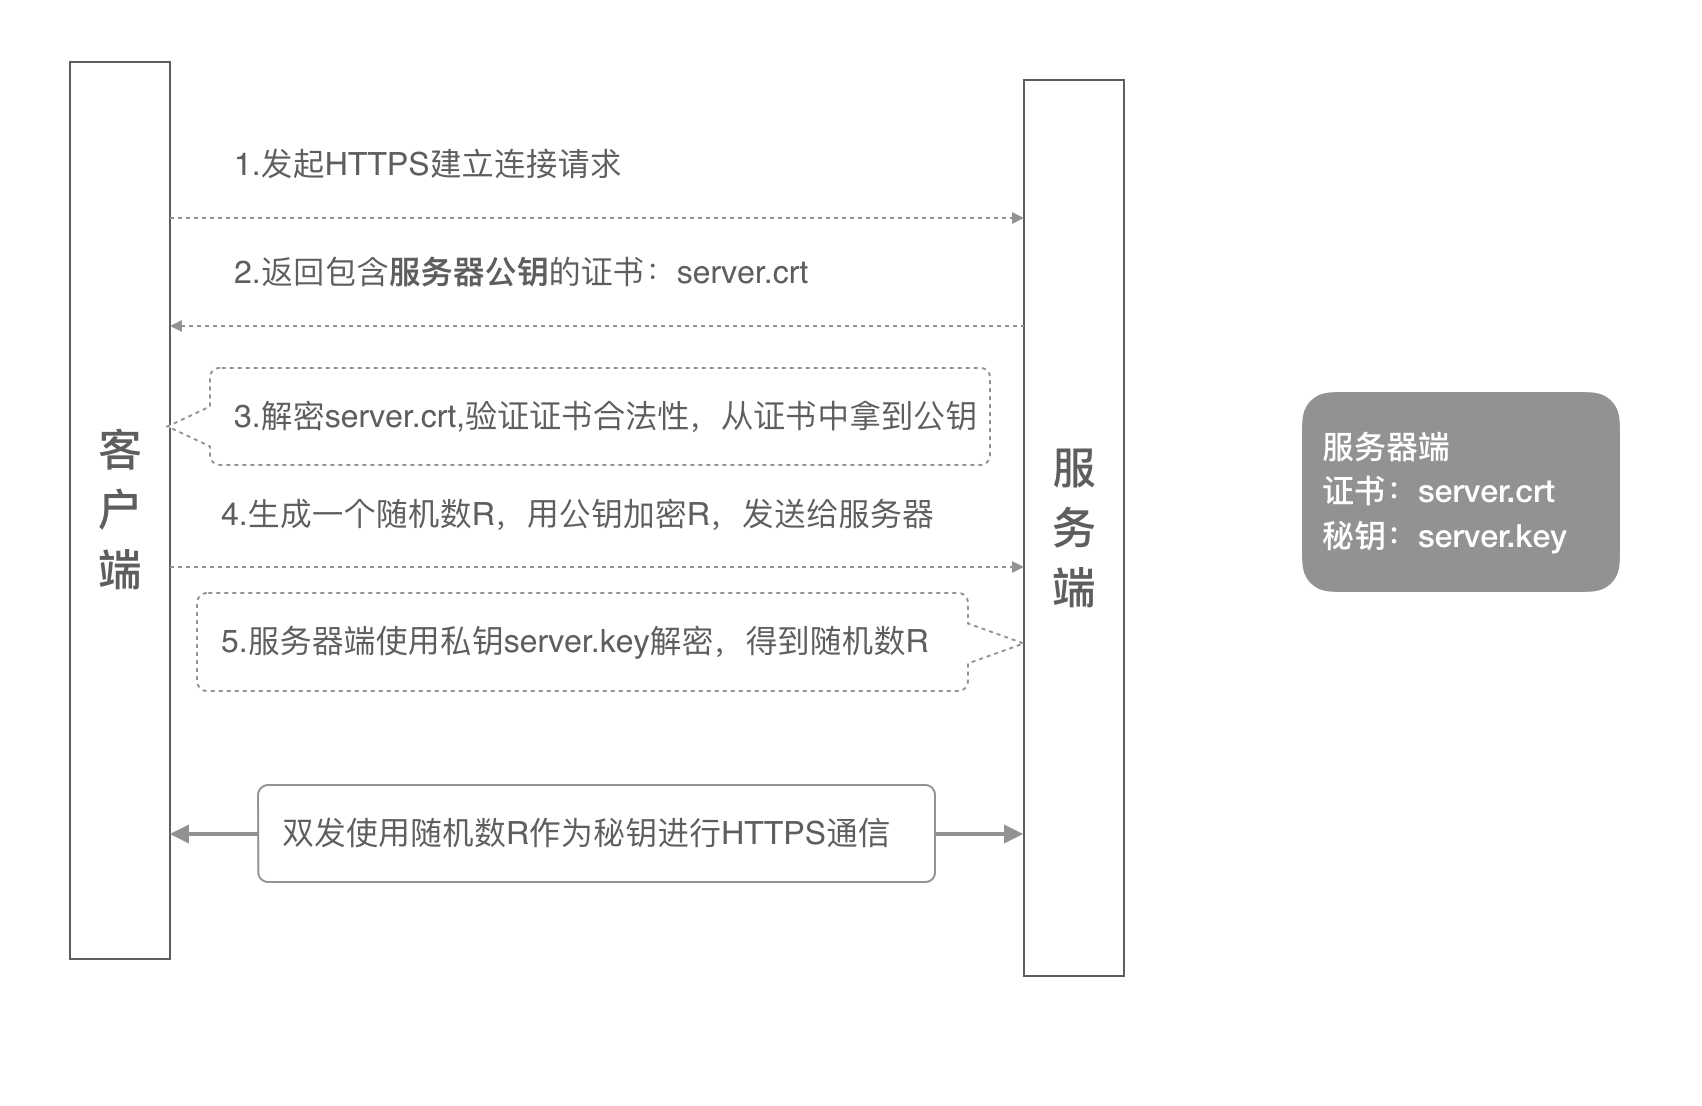
单向认证
客户端发起建立HTTPS连接请求,将SSL协议版本的信息发送给服务器端;
服务器端将本机的公钥证书(server.crt)发送给客户端;
客户端读取公钥证书(server.crt),取出了服务端公钥;
客户端生成一个随机数(密钥R),用刚才得到的服务器公钥去加密这个随机数形成密文,发送给服务端;
服务端用自己的私钥(server.key)去解密这个密文,得到了密钥R
服务端和客户端在后续通讯过程中就使用这个密钥R进行通信了。
如图为单向认证流程

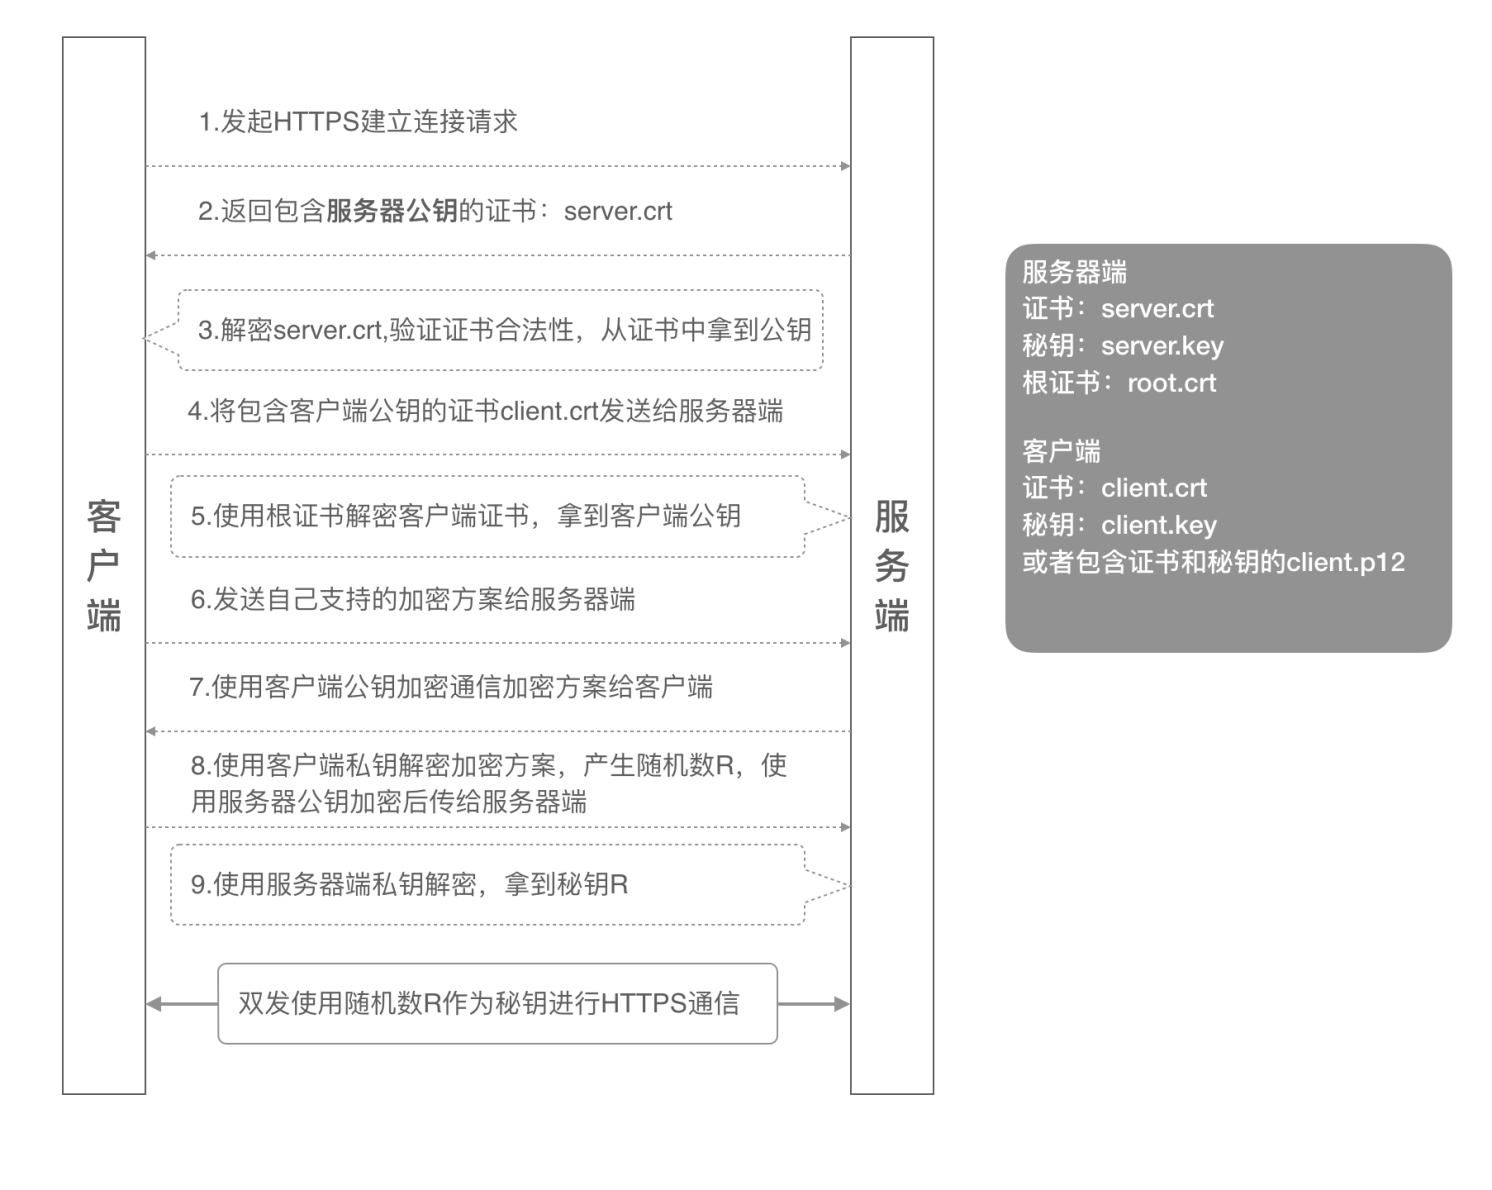
双向认证
- 客户端发起建立HTTPS连接请求,将SSL协议版本的信息发送给服务端;
- 服务器端将本机的公钥证书(server.crt)发送给客户端;
- 客户端读取公钥证书(server.crt),取出了服务端公钥;
- 客户端将客户端公钥证书(client.crt)发送给服务器端;
- 服务器端使用根证书(root.crt)解密客户端公钥证书,拿到客户端公钥;
- 客户端发送自己支持的加密方案给服务器端;
- 服务器端根据自己和客户端的能力,选择一个双方都能接受的加密方案,使用客户端的公钥加密8. 后发送给客户端;
- 客户端使用自己的私钥解密加密方案,生成一个随机数R,使用服务器公钥加密后传给服务器端;
- 服务端用自己的私钥去解密这个密文,得到了密钥R
- 服务端和客户端在后续通讯过程中就使用这个密钥R进行通信了。
如图为双向认证流程

生成
自签名证书生成
- 1.ca证书生成(ca私钥)
1
2
3
mkdir /etc/nginx/keys/
cd /etc/nginx/keys/
openssl genrsa -out ca.key 4096 - 2.ca数字证书生成
1
openssl req -new -x509 -days 3650 -key ca.key -out ca.crt
信息Common name 填写域名或ip地址,其余随意填写
- 用 CA 私钥签发 server 的数字证书
1
openssl x509 -req -in server.csr -CA ca.crt -CAkey ca.key -CAcreateserial -out server.crt -days 3650
- 用 CA 私钥签发 server 的数字证书
- 生成客户端的私钥与证书
1
openssl genrsa -out client.key 4096
- 生成客户端的私钥与证书
- 生成客户端数字证书
1
openssl req -new -key client.key -out client.csr
信息与ca保持一致
- 生成客户端数字证书
- openssl req -new -key client.key -out client.csr
1
openssl x509 -req -in client.csr -CA ca.crt -CAkey ca.key -CAcreateserial -out client.crt -days 3650
- openssl req -new -key client.key -out client.csr
Nginx配置
安装nginx并启用ssl模块
- nginx配置文件如下:
1
2
3
4
5
6
7
8
9
10
11
12
13
14
15
16
17
18
server {
listen 443;
server_name localhost;
ssl on;
ssl_certificate /etc/nginx/keys/server.crt;#配置证书位置
ssl_certificate_key /etc/nginx/keys/server.key;#配置秘钥位置
ssl_client_certificate /etc/nginx/keys/ca.crt;#双向认证
ssl_verify_client on; #双向认证
ssl_session_timeout 5m;
ssl_protocols SSLv2 SSLv3 TLSv1 TLSv1.1 TLSv1.2; #按照这个协议配置
ssl_ciphers ECDHE-RSA-AES128-GCM-SHA256:HIGH:!aNULL:!MD5:!RC4:!DHE; #按照这个套件配置
ssl_prefer_server_ciphers on;
root html;
index index.html;
location / {
try_files $uri $uri/ =404;
}
}在测试前重新nginx
1
2
3
nginx -t
nginx -v
nginx -s reload
测试
java测试
代码如下
1
2
3
4
5
6
7
8
9
10
11
12
13
14
15
16
17
18
19
20
21
22
23
24
25
26
27
28
29
30
31
32
33
34
35
36
37
38
39
40
41
42
43
44
45
46
47
48
49
50
51
import org.apache.http.HttpEntity;
import org.apache.http.client.methods.CloseableHttpResponse;
import org.apache.http.client.methods.HttpGet;
import org.apache.http.conn.ssl.SSLConnectionSocketFactory;
import org.apache.http.impl.client.CloseableHttpClient;
import org.apache.http.impl.client.HttpClients;
import org.apache.http.ssl.SSLContexts;
import org.apache.http.util.EntityUtils;
import javax.net.ssl.SSLContext;
import java.io.File;
import java.io.FileInputStream;
import java.io.InputStream;
import java.security.KeyStore;
public class HttpClientWithClientCert {
private final static String PFX_PATH = "/Users/fred/temp/cert5/client.p12"; //客户端证书路径
private final static String PFX_PWD = "123456"; //客户端证书密码
public static String sslRequestGet(String url) throws Exception {
KeyStore keyStore = KeyStore.getInstance("PKCS12");
InputStream instream = new FileInputStream(new File(PFX_PATH));
try {
keyStore.load(instream, PFX_PWD.toCharArray());
} finally {
instream.close();
}
SSLContext sslcontext = SSLContexts.custom().loadKeyMaterial(keyStore, PFX_PWD.toCharArray()).build();
SSLConnectionSocketFactory sslsf = new SSLConnectionSocketFactory(sslcontext
, new String[] { "TLSv1" } // supportedProtocols ,这里可以按需要设置
, null // supportedCipherSuites
, SSLConnectionSocketFactory.getDefaultHostnameVerifier());
CloseableHttpClient httpclient = HttpClients.custom().setSSLSocketFactory(sslsf).build();
try {
HttpGet httpget = new HttpGet(url);
//httpget.addHeader("host", "integration-fred2.fredhuang.com");// 设置一些heander等
CloseableHttpResponse response = httpclient.execute(httpget);
try {
HttpEntity entity = response.getEntity();
String jsonStr = EntityUtils.toString(response.getEntity(), "UTF-8");//返回结果
EntityUtils.consume(entity);
return jsonStr;
} finally {
response.close();
}
} finally {
httpclient.close();
}
}
public static void main(String[] args) throws Exception {
System.out.println(System.getProperty("java.home"));
System.out.println(sslRequestGet("https://integration-fred2.fredhuang.com"));
}
}测试方法如下
1
2
cd $JAVA_HOME
sudo ./bin/keytool -import -alias ttt -keystore cacerts -file /Users/fred/temp/cert5/server.crt
curl 工具测试
demo
1
curl -v
test
1
curl --cacert ca.crt --cert client.crt --key client.key --tlsv1.2 https://192.168.0.162
detail
1
2
3
4
5
6
7
8
9
10
11
12
13
14
15
16
17
18
19
20
21
22
23
24
25
26
27
28
29
30
31
32
33
34
35
36
37
38
39
40
41
42
43
44
45
46
47
48
49
50
51
52
53
54
55
56
57
58
59
60
61
62
63
64
65
66
67
68
69
70
71
72
73
74
75
#--cert指定客户端公钥证书的路径
#--key指定客户端私钥文件的路径
#-k 使用本参数不校验证书的合法性,因为我们用的是自签名证书
#可以使用-v来观察具体的SSL握手过程
curl --cert ./client.crt --key ./client.key https://integration-fred2.fredhuang.com -k -v
* Rebuilt URL to: https://47.93.XX.XX/
* Trying 47.93.XX.XX...
* TCP_NODELAY set
* Connected to 47.93.XX.XX (47.93.XX.XX) port 443 (#0)
* ALPN, offering h2
* ALPN, offering http/1.1
* Cipher selection: ALL:!EXPORT:!EXPORT40:!EXPORT56:!aNULL:!LOW:!RC4:@STRENGTH
* successfully set certificate verify locations:
* CAfile: /etc/ssl/cert.pem
CApath: none
* TLSv1.2 (OUT), TLS handshake, Client hello (1):
* TLSv1.2 (IN), TLS handshake, Server hello (2):
* TLSv1.2 (IN), TLS handshake, Certificate (11):
* TLSv1.2 (IN), TLS handshake, Server key exchange (12):
* TLSv1.2 (IN), TLS handshake, Request CERT (13):
* TLSv1.2 (IN), TLS handshake, Server finished (14):
* TLSv1.2 (OUT), TLS handshake, Certificate (11):
* TLSv1.2 (OUT), TLS handshake, Client key exchange (16):
* TLSv1.2 (OUT), TLS handshake, CERT verify (15):
* TLSv1.2 (OUT), TLS change cipher, Client hello (1):
* TLSv1.2 (OUT), TLS handshake, Finished (20):
* TLSv1.2 (IN), TLS change cipher, Client hello (1):
* TLSv1.2 (IN), TLS handshake, Finished (20):
* SSL connection using TLSv1.2 / ECDHE-RSA-AES256-GCM-SHA384
* ALPN, server accepted to use http/1.1
* Server certificate:
* subject: C=CN; ST=BJ; L=BJ; O=Alibaba; OU=Test; CN=integration-fred2.fredhuang.com; emailAddress=a@alibaba.com
* start date: Nov 2 01:01:34 2019 GMT
* expire date: Oct 30 01:01:34 2029 GMT
* issuer: C=CN; ST=BJ; L=BJ; O=Alibaba; OU=Test; CN=root; emailAddress=a@alibaba.com
* SSL certificate verify result: unable to get local issuer certificate (20), continuing anyway.
> GET / HTTP/1.1
> host:integration-fred2.fredhuang.com
> User-Agent: curl/7.54.0
> Accept: */*
>
< HTTP/1.1 200 OK
< Server: nginx/1.17.5
< Date: Sat, 02 Nov 2019 02:39:43 GMT
< Content-Type: text/html
< Content-Length: 612
< Last-Modified: Wed, 30 Oct 2019 11:29:45 GMT
< Connection: keep-alive
< ETag: "5db97429-264"
< Accept-Ranges: bytes
<
<!DOCTYPE html>
<html>
<head>
<title>Welcome to nginx!</title>
<style>
body {
width: 35em;
margin: 0 auto;
font-family: Tahoma, Verdana, Arial, sans-serif;
}
</style>
</head>
<body>
<h1>Welcome to nginx!</h1>
<p>If you see this page, the nginx web server is successfully installed and
working. Further configuration is required.</p>
<p>For online documentation and support please refer to
<a href="http://nginx.org/">nginx.org</a>.<br/>
Commercial support is available at
<a href="http://nginx.com/">nginx.com</a>.</p>
<p><em>Thank you for using nginx.</em></p>
</body>
</html>
* Connection #0 to host 47.93.XX.XX left intacttest demo
如图

succ demo
如图


